

Shipping Plus Setup
Overview
Section titled “Overview”Shipping Plus configures Corso as a Shopify Carrier Calculated Shipping Service. This allows Corso to provide rates with advanced functionality not available with standard Shopify rates.
It’s easy to get setup. Let’s help you get started.
Make Sure You Are on a Supported Shopify Plan
Section titled “Make Sure You Are on a Supported Shopify Plan”The availability of Corso as a third-party carrier-calculated shipping depends on your store’s plan:
- Shopify Plus: Available and included in plan.
- Shopify Advanced: Available and included in plan.
- Shopify Grow: Available for an additional monthly fee if your store is on a monthly subscription plan, or included in an annual billing plan.
- All other plans: Not available.
Understanding How Shopify Rates Work
Section titled “Understanding How Shopify Rates Work”Rates are provided to your customers at checkout based upon a variety of factors including geo zone, fulfilment location, shipping profile, and rate conditions.
While there are more advanced settings than this, let’s review what each of these are and how they impact your rates.
The factors below are the priority of what Shopify looks at to provide rates to your customer.
1. Shipping Profiles
Section titled “1. Shipping Profiles”First on the list is shipping profiles. You can set up independent shipping profiles in Shopify which are typically used to offer rates specific to a product line. Shopify profiles allow you to select which products will be impacted and then within that profile, you are able to independently set up your fulfillment locations, shipping zones, and rates.
Be aware that when a cart has products from different shipping profiles, this is considered a multi-shipment cart and Shopify has unique functionality related to multi-shipments that most merchants are not aware of.
2. Fulfilment Location
Section titled “2. Fulfilment Location”You set up shipping rates according to your fulfillment locations in Shopify. With each of the locations you fulfill from, you can determine shipping zones per each fulfillment location or have multiple fulfillment locations shipping to the same shipping zone.
In this example, we just have one fulfillment location that is going to be shipping all of our domestic orders.
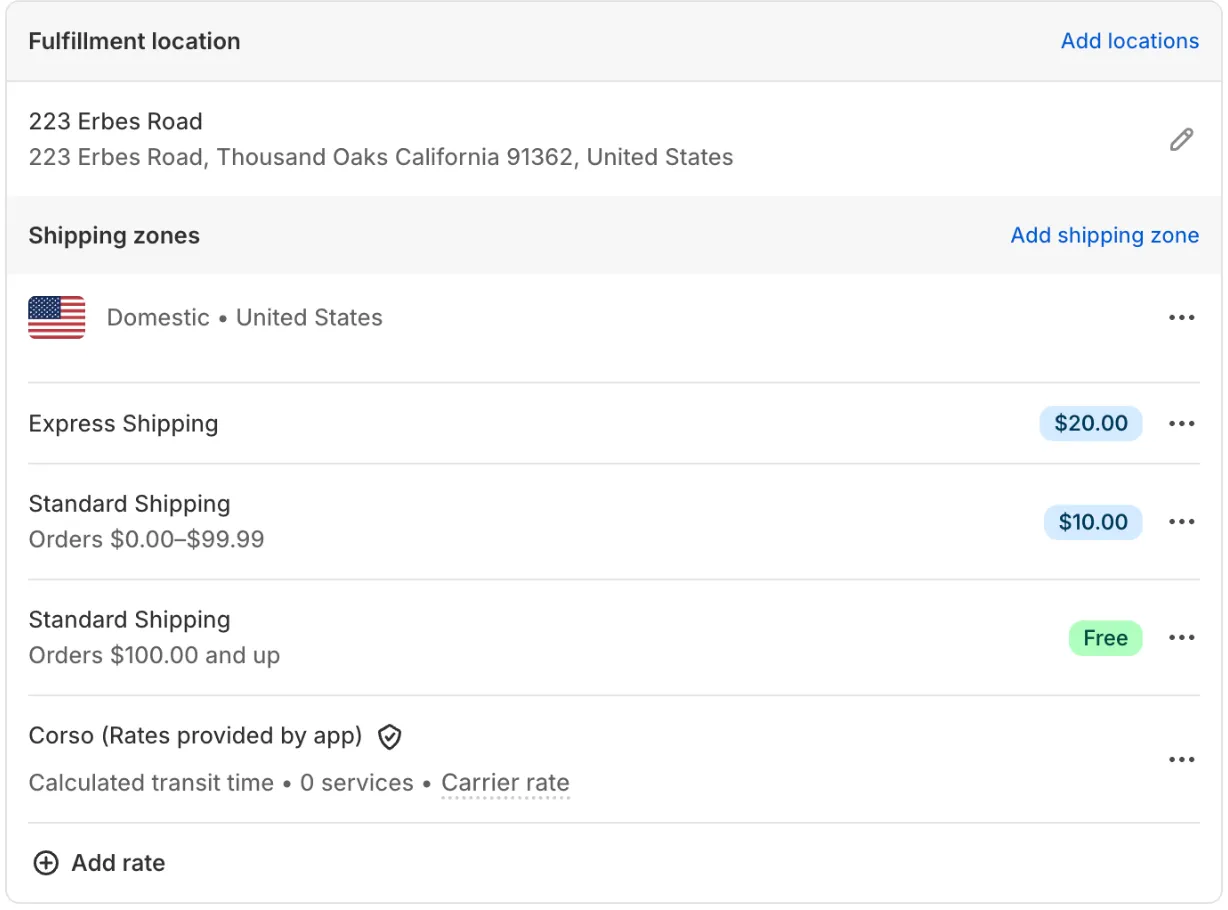
Multi-shipments also apply to fulfilment locations. Typically Shopify will try to fulfill the order from the same location if inventory is available in that location. For carts with multiple products and if inventory must be used from multiple locations, then Shopify will consider the cart to be a multi-shipment.
3. Shipping Zone / Geo Zone
Section titled “3. Shipping Zone / Geo Zone”Rates are set up by geo zones which includes a combination of both countries and states/provinces. These zones can be configured in each of your shipping profiles.
Typically brands will have unique zones for domestic rates versus international rates and sometimes these can get more granular for states such as Hawaii, Alaska, outlying islands, etc.
Countries may also have their own unique geo zones depending on where you sell products and how you ship to those countries.
You’ll notice how Corso has automatically been added as a rate provider to any of your existing shipping zones. We will cover what this means later in this article.
4. Rates & Conditions
Section titled “4. Rates & Conditions”Rates correspond to specific shipping zones. Basic Shopify rates can be set up directly in Shopify or you can get your rates from a 3rd party like Corso for more advanced functionality.
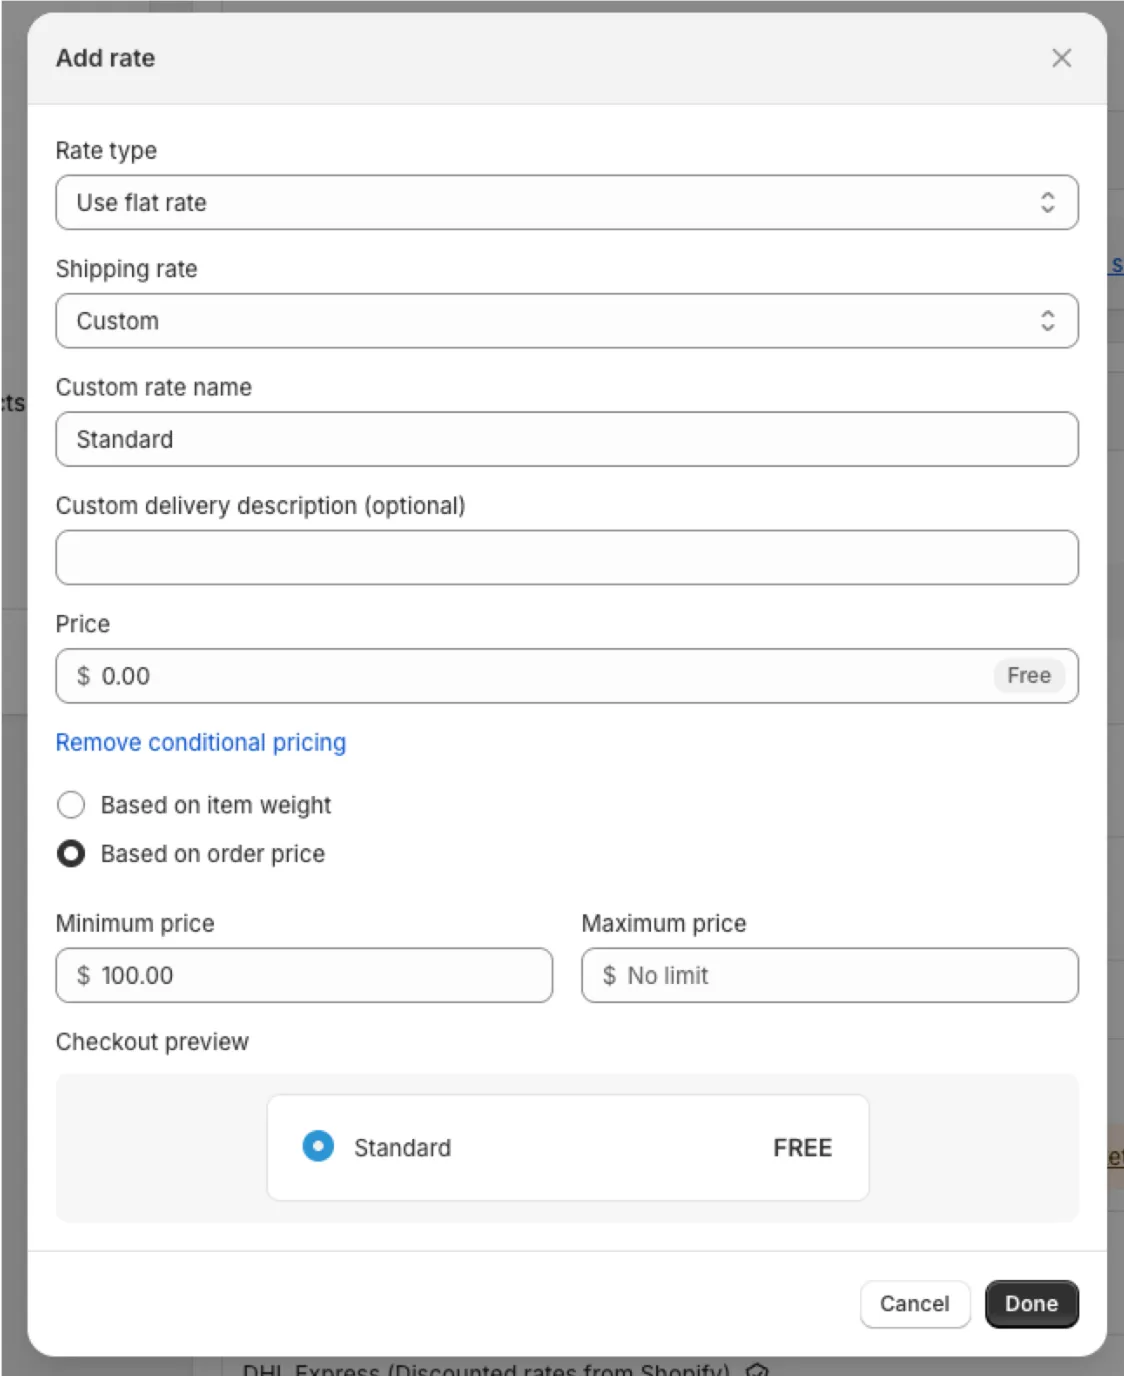
In the example below, this is a basic setup for a standard shipping option with free shipping over $100.
Import Your Geo Zones & Rates & Conditions
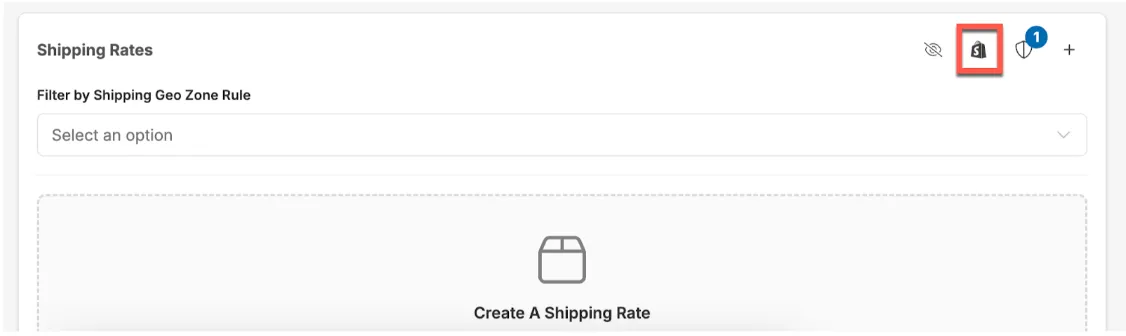
Section titled “Import Your Geo Zones & Rates & Conditions”The easiest way to get started with Shipping Plus is to sync your geo zones and rates to Corso. Go to Settings > Shipping Plus and click the Shopify button in the Shipping Rates card, then confirm Sync Rates And Shipping Zones. Corso imports the shipping zones and corresponding rates and conditions in any of your shipping profiles.
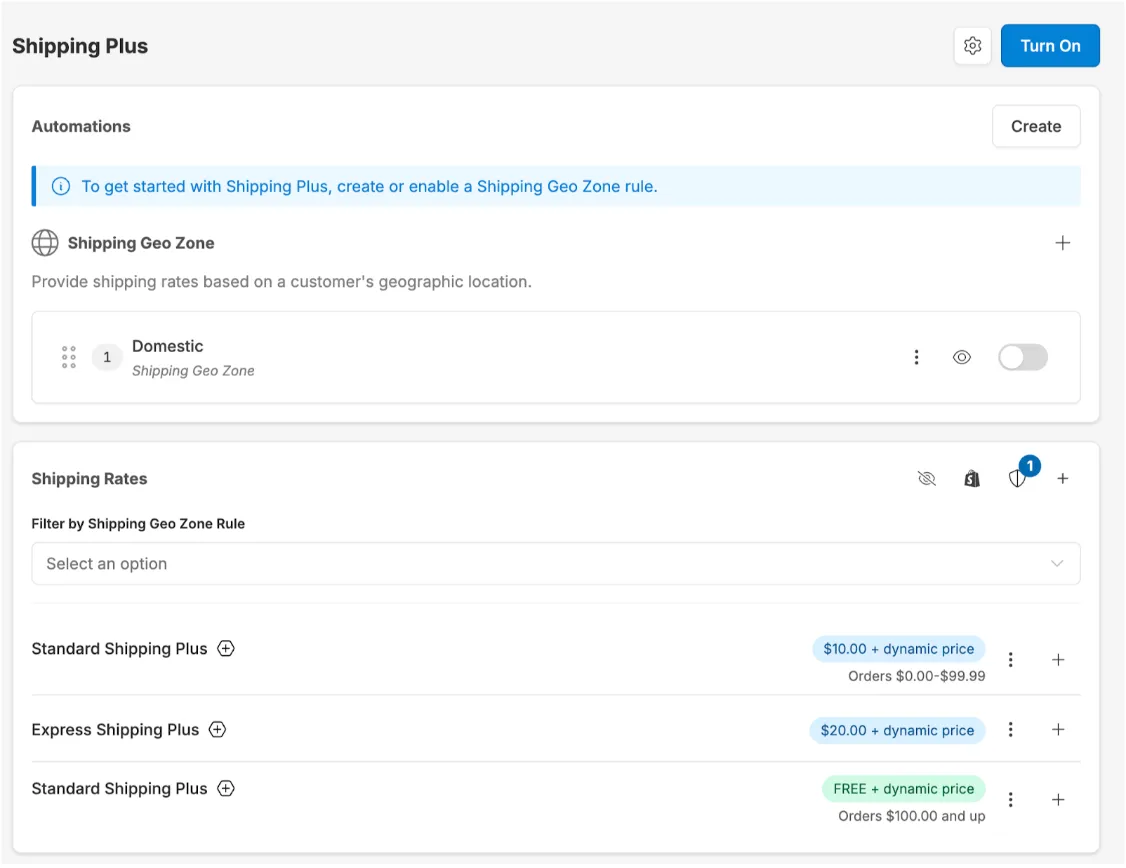
Each Shopify shipping zone, except Rest of World, becomes a Shipping Geo Zone rule in the Automations card. Imported rules start turned off so you can review them first. A Shipping Geo Zone rule uses Order Country and Order State or Province conditions to decide which rates to offer. If more than one Shipping Geo Zone rule matches the shipping address, the customer sees the rates from every matching rule.
Each sync adds a new, turned-off Shipping Geo Zone rule for every Shopify zone, even if you synced before. After a re-sync, review the Automations card and delete duplicate rules. Existing enabled rules keep pointing at their old rates, and a rate whose Shopify definition changed is imported as a new rate.
Depending on how complex your rates configuration is inside of Shopify, it may create a lot of geo zones and rates. But for a basic setup based on the Shopify rates from this example, it might look something like this.
Shipping Plus Rates
Section titled “Shipping Plus Rates”By default, Corso creates rates that are “Plus” enabled. This means that we are marking up the existing rate with a dynamic price. Typically this dynamic price is used for services such as shipping protection, free returns, or sustainable shipping.
When you edit a rate, the Enable Plus Rate toggle controls this. The Price is the rate before the Plus price is added, and you can give the Plus version its own Plus Name and Plus Description.
You can know if a rate is “Plus” enabled by the plus icon next to the rate.
Show Original Rate
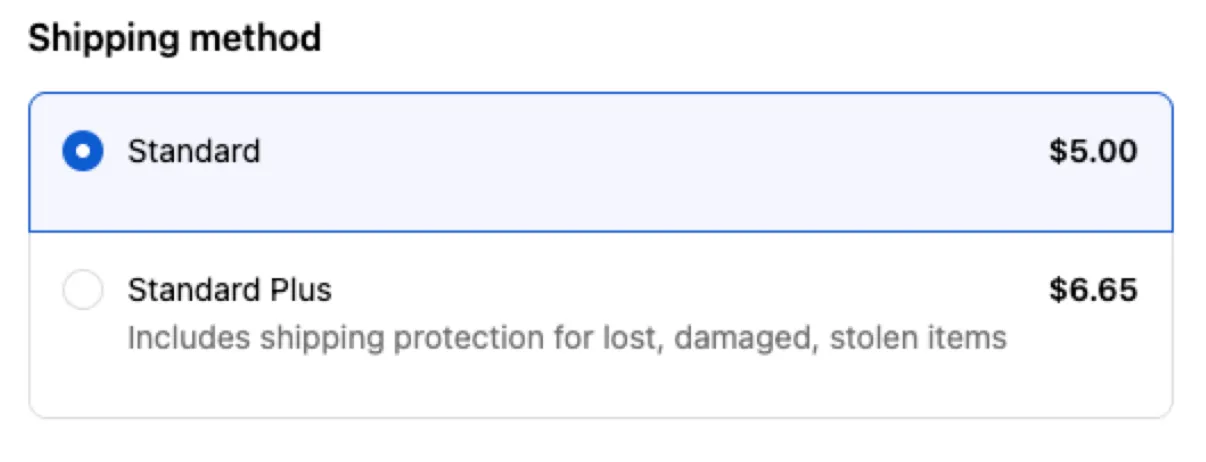
Section titled “Show Original Rate”Rather than show a rate from Shopify, you can choose to let Corso display the “original rate”. When this toggle is enabled, then both rates will display for the customer: the rate WITHOUT the additional shipping plus price & the rate WITH the additional shipping plus price.
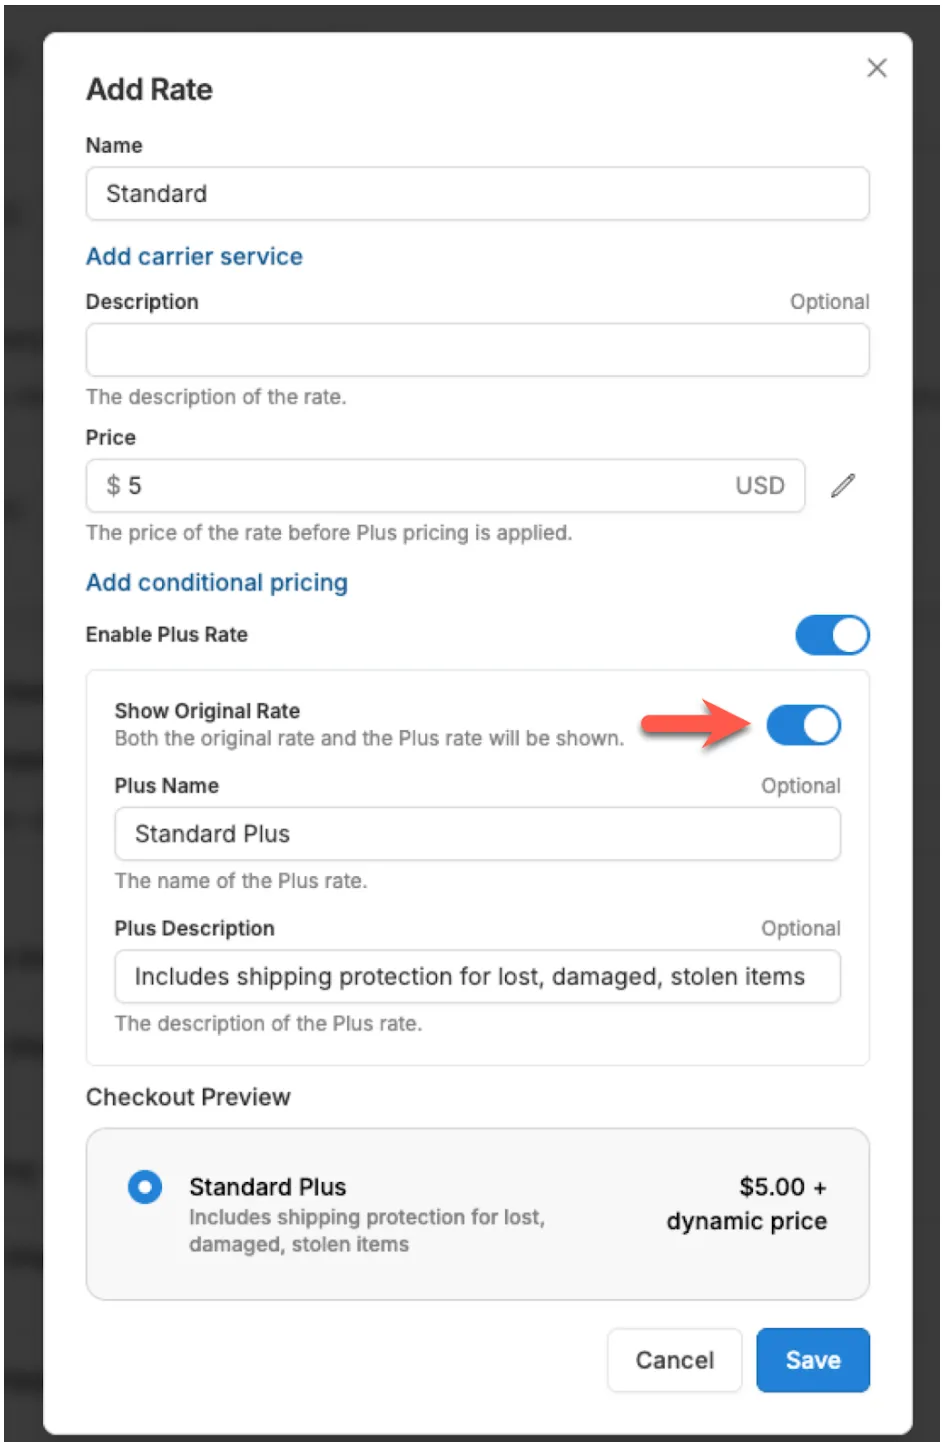
Rates that are configured to show the original rate will be indicated by the eyeball icon.

The customer would see two rates (the Plus rate and the original rate) as shown here:
Turning On Shipping Plus
Section titled “Turning On Shipping Plus”You are now just a few clicks away from offering rates marked up with Shipping Plus:
-
Enable a Shipping Geo Zone rule
- You can set up as many Shipping Geo Zone rules as you want with any configuration of rates to make things easy to enable and disable.
- To start offering rates for a specific zone, enable its Shipping Geo Zone rule in the Automations card.
-
Turn On Shipping Plus
- Click Turn On at the top of the Shipping Plus page.
- Once Shipping Plus is on, then Shipping Plus rates will immediately start being offered to your customers alongside the rates you have set up in Shopify.
If Shipping Plus is on but no Shipping Geo Zone rule is enabled, Corso does not offer any rates and the page shows a warning.
Keep Shopify rates from overriding yours
Section titled “Keep Shopify rates from overriding yours”If you add a rate in Shopify with the same name as a Shipping Plus rate (for example, a cheaper or free Standard), Shopify shows only the cheapest rate with that name, so your Shipping Plus rate can disappear. Remove the duplicate from Shopify, or give your Shipping Plus rate a distinct name.
Turning off Shipping Plus
Section titled “Turning off Shipping Plus”Before you turn off Shipping Plus, add your own shipping rates back in Shopify. Once Shipping Plus is off, Corso stops offering rates, and if Shopify has no rates for an address, customers can’t check out. After your Shopify rates are in place, you can turn off Shipping Plus and remove Corso as a rate provider from your Shopify shipping zones.
Advanced Shipping Plus Scenarios
Section titled “Advanced Shipping Plus Scenarios”Now that Shipping Plus is turned on, you can add more Shipping Plus rules from the Automations card:
- Rate Modification — add fees, apply shipping discounts, give back the Plus price, or change which rates are offered. See Rate Modifications.
- Delivery Estimate — show estimated delivery dates on your rates. See Estimated Delivery Date Functionality.
- Parcel Size — set the box dimensions used to calculate carrier rates. See Parcel size rules below.
It also helps to understand how Shopify merges rates from rate providers like Corso with your Shopify rates. See Rates Provided By App.
Parcel size rules
Section titled “Parcel size rules”If a rate uses a carrier service, Corso requests a live rate from the carrier at checkout. A Parcel Size rule tells Corso which box dimensions to send with that request.
- In the Automations card, click Create, then select Parcel Size.
- Add conditions, such as Product SKU or Product Group, to match the products that ship in this box.
- Choose a predefined box from Type, or choose a custom parcel and enter the Name, Length, Width, and Height in inches.
- Save the rule.
Parcel sizes only affect rates that use a carrier service. Only one Parcel Size rule applies at checkout. If more than one rule matches, Corso uses the first matching rule in your list.