Embed Your Portal
Getting Started
Section titled “Getting Started”This guide will walk you through how to add Corso’s Embedded UI to a custom page in your Shopify theme, so you can power a returns portal, order status page, or other post-purchase experiences.
Step 1 – Create a New Page Template in Shopify
Section titled “Step 1 – Create a New Page Template in Shopify”- Go to Online Store > Themes and click Customize on your active theme.
- In the top center dropdown, change from Home Page to Pages.
- Click Create Template.
- Give your new template a name (e.g. Order Status, Returns Portal, or Order Management) and click Create Template.
- Go back to Shopify Admin > Pages.
- Click Add Page.
- Name your new page and under Theme Template, select the template you just created (e.g.
page.order-status).
Step 2 – Open the Page Template in Theme Editor
Section titled “Step 2 – Open the Page Template in Theme Editor”- Return to Online Store > Themes > Customize.
- Use the dropdown to select your new page (e.g. Returns & Exchanges or Order Status).
- This will open your newly created template for editing.
Step 3 – Add the Corso Embedded App Block
Section titled “Step 3 – Add the Corso Embedded App Block”- In the theme editor sidebar, click Add Block.

Step 4 – Configure the Embedded App Settings
Section titled “Step 4 – Configure the Embedded App Settings”-
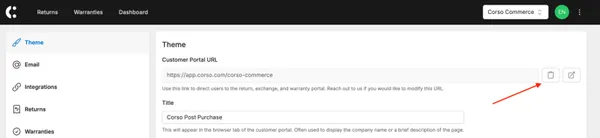
Open a new tab and go to your Corso Admin.
-
Copy your Customer Portal URL.
-
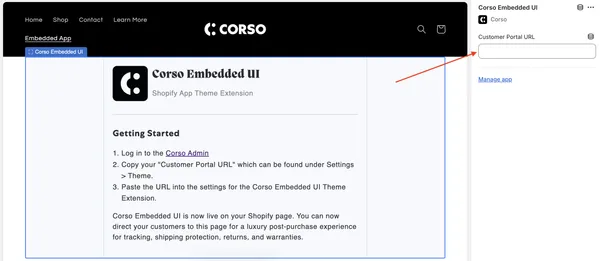
Return to the Shopify theme editor.
-
In the Corso block settings, paste your Customer Portal URL.
-
Click Save.
Step 5 – You’re Live!
Section titled “Step 5 – You’re Live!”- The Corso Embedded App is now fully live on your Shopify page. Customers will be able to access the portal directly from this new page on your site.
